 |
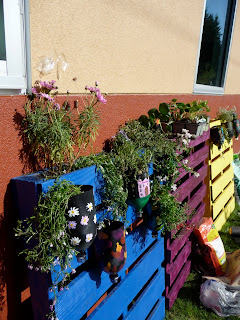
| Laura, also known as "the garden lady" collected some old 2 liter pop bottles cut off the bottoms, painted them black, and beautified them with some lively colored acrylic paints. wow! |
Monday, July 25, 2011
vertical gardening...
Do you live in an apartment? Do you live somewhere with not much green space? Do you want to grow? If so, vertical gardening can be a perfect solution. There are soo many different ways to "grow up" but we decided to use recycled shipping palates. They can be found anywhere (even look on craigslist!!) and don't many uses (or at least I thought..).
Subscribe to:
Post Comments (Atom)


Hi Everyone! Garden Lady here--I just wanted to post some of What I Learned About Painting:
ReplyDelete1. Try to pick pallets that aren't too greasy/dirty/yucky--they require a lot less paint! These 3 I found were very unpretty, and took 2 cans of primer apiece! If you have decent sanding equipment (I don't!) that might help too by smoothing all the rough spots that suck up paint.
2. Use paints that are formulated for what you are painting! For the pots, I used a special paint for plastic (you can also get a primer that goes on plastic, and then you can paint over in any old color you want). We chose to paint our bottle pots black to help warm up the soil, especially for early/late season plants like greens and radishes. The paint for plastic is supposed to stick to the plastic bottle better than paint for wood or metal.
3. A clear coat over everything is a good idea! Don't pick an enamel paint to use on over the plastic paint though--it will soften/dissolve your plastic paint, which you can see on the first bottle pots I painted. Not a horrible mistake, but not optimal either. For the second set, I asked the wonderful paint department lady at Home Depot what I should use, and she set me straight--those pots look much better!
Happy coloring!